How Can We Help?
Entering Standing Orders (Meal Pattern)
1.
From the meal pattern screen, click on the long Meal Pattern tab at the top to make sure you are in the correct place to enter standing orders.

2.
If you are entering just one item that is unique and not listed in the global meal pattern (explained later), click on the new icon in the top left corner (sheet of paper). The “Add a New Meal Pattern Item” box will appear. You can create a new entry as “New” or “New From Existing”. New From Existing will create a new entry but copies the information from another entry already in the list that is highlighted.
For example, if you want to serve a banana at breakfast and lunch, you could add banana to the meal pattern at breakfast. If the banana is still highlighted, you can click “New From Existing” and then you only need to change the meal or nourishment time (everything else will be filled in).
Fill in each drop down box appropriately for the item you wish to add to the meal pattern. The boxes outlined in red below must be filled in to add a new item correctly.

3.
1.Choose the Mealtime/Nourishment time
2.Choose the Menu Category (the spot on the ticket where you want the item to appear on the ticket).
3.Choose the item, by clicking in the box and starting to type what you are looking for, then select by highlighting the item.
4.Select the Item Size.
5.Select the Consistency. This should pre-fill in with the appropriate consistency, but if not choose the consistency. Don’t choose regular if the resident is receiving the item in its “natural” condition. You would only choose regular if the resident isn’t a regular texture, but needs the item regular consistency. Ex: a puree who can have a regular banana.
6.Select the Item Type (if applicable).
7.Choose the Portion Size (if NOT a regular).
8.Choose the Service Item (ex: food in bowls, on the side, etc.)
9.Menu Options: Standard – means they will get the item in place of what is scheduled to be served on the menu. In this example, the resident will get a hamburger for the entrée instead of what is on the menu. Add To Menu (ATM) – means they will get the entrée scheduled to be served that day AND the hamburger. Add When No Similar Item Found (ANSIF) – means they will get the hamburger and the entrée scheduled to be served that day as long as the scheduled item isn’t a hamburger. Good for the option of a resident wanting ice cream plus dessert, but they don’t want 2 when ice cream is on the menu.
10.Child Items tab can be used to enter in accompaniments you would like to serve with the main item (ketchup and mustard for example). Items with Child Items assigned to them will be noted in the meal pattern listing with a + sign to the left.
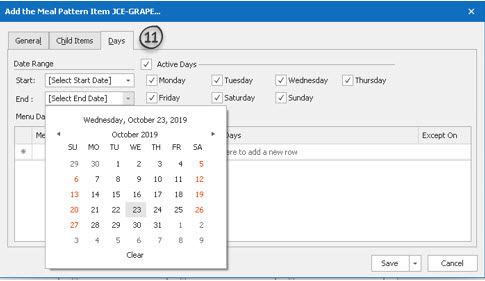
11.The Days tab can be used to schedule the item to be served every day or on specific days. The default setting is EVERY DAY. To specify the day, uncheck the days the item shouldn’t be served. You can also set a date range for when you would like the item to be served by using the Start and End dates. For example, if Mrs. Smith wants ice cream for dessert every day during summer you can set the start date to June 1st and end date to August 31st. The item will automatically start and stop printing on her ticket on those dates.
2.Choose the Menu Category (the spot on the ticket where you want the item to appear on the ticket).
3.Choose the item, by clicking in the box and starting to type what you are looking for, then select by highlighting the item.
4.Select the Item Size.
5.Select the Consistency. This should pre-fill in with the appropriate consistency, but if not choose the consistency. Don’t choose regular if the resident is receiving the item in its “natural” condition. You would only choose regular if the resident isn’t a regular texture, but needs the item regular consistency. Ex: a puree who can have a regular banana.
6.Select the Item Type (if applicable).
7.Choose the Portion Size (if NOT a regular).
8.Choose the Service Item (ex: food in bowls, on the side, etc.)
9.Menu Options: Standard – means they will get the item in place of what is scheduled to be served on the menu. In this example, the resident will get a hamburger for the entrée instead of what is on the menu. Add To Menu (ATM) – means they will get the entrée scheduled to be served that day AND the hamburger. Add When No Similar Item Found (ANSIF) – means they will get the hamburger and the entrée scheduled to be served that day as long as the scheduled item isn’t a hamburger. Good for the option of a resident wanting ice cream plus dessert, but they don’t want 2 when ice cream is on the menu.
10.Child Items tab can be used to enter in accompaniments you would like to serve with the main item (ketchup and mustard for example). Items with Child Items assigned to them will be noted in the meal pattern listing with a + sign to the left.
11.The Days tab can be used to schedule the item to be served every day or on specific days. The default setting is EVERY DAY. To specify the day, uncheck the days the item shouldn’t be served. You can also set a date range for when you would like the item to be served by using the Start and End dates. For example, if Mrs. Smith wants ice cream for dessert every day during summer you can set the start date to June 1st and end date to August 31st. The item will automatically start and stop printing on her ticket on those dates.

4.
When all the information has been filled in, click Save. The item you just added will appear in blue on the screen. You can also use the option with the drop down to save to all meals (adding in a banana at BLS).