Archive
Blog Archives

Food Allergy

Food Allergy - Creating a New One and Linking

1.
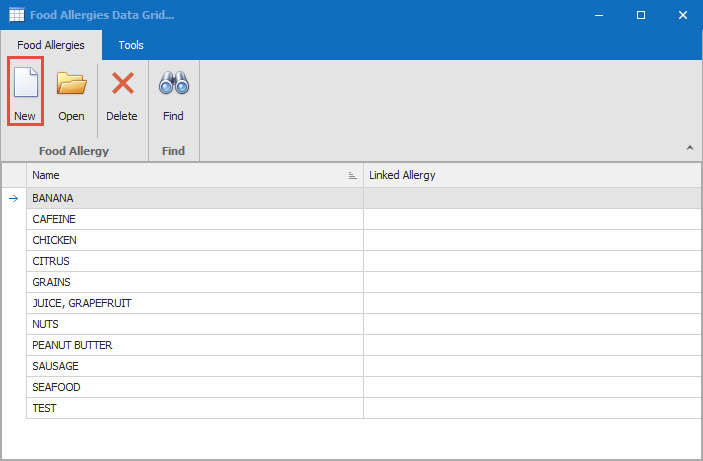
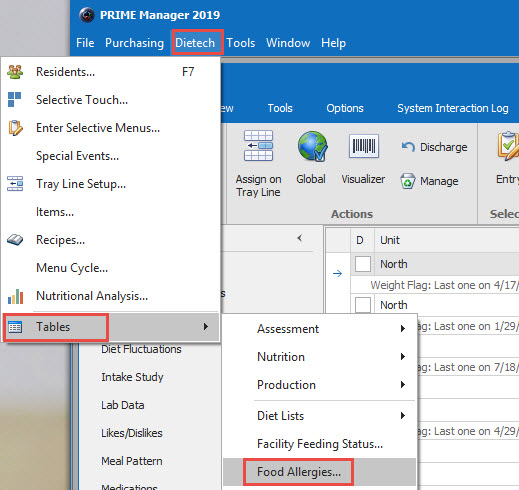
From the Dietech tab go to Tables, Food Allergies. Create a new allergy and click Save.  
2.
If there isn't a Food Allergy go to Dietech, Tables, Food Allergies and add in a new Food Allergy. Add in the Food Allergy. Click Save
3.
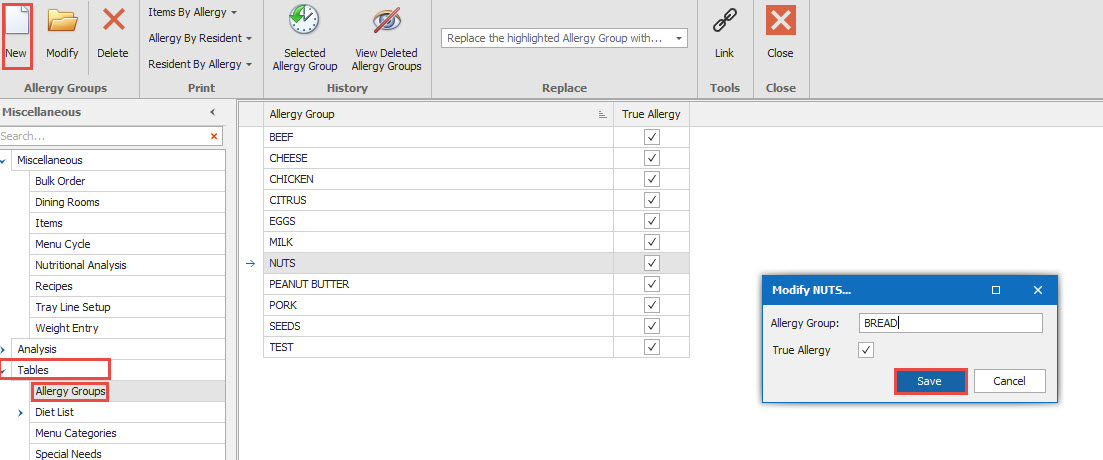
Go to Dietech, from the Resident Data Grid go to Miscellaneous, Tables. Click on the Arrow sign next to Tables. Choose Allergy Groups. Add in a new Allergy Group. Click Save
4.
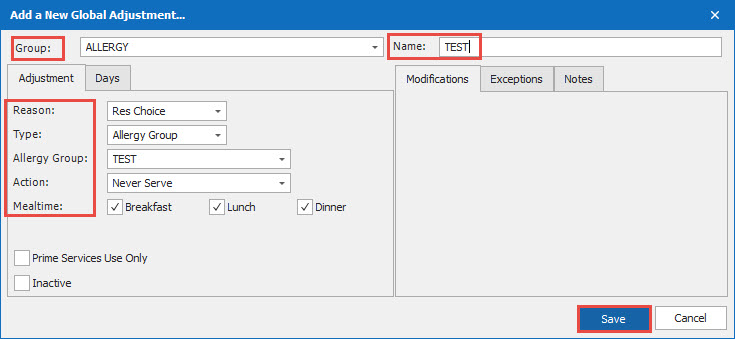
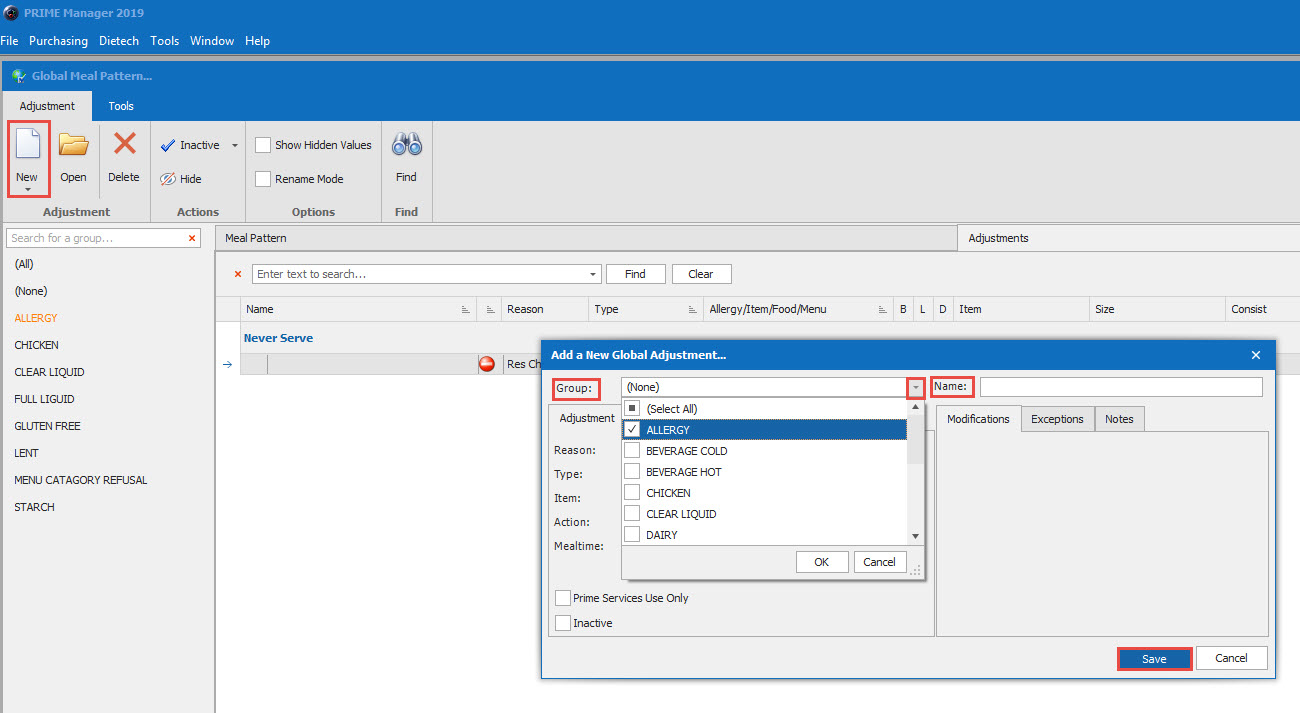
Go to Global Adjustments. Choose New. Using the drop down arrow select the Allergy Group and click OK. Enter in the Name of the Allergy, continue with entering in the Group, Name, Reason, Type, Allergy Group, Action, Meal Time and Save. 
5.
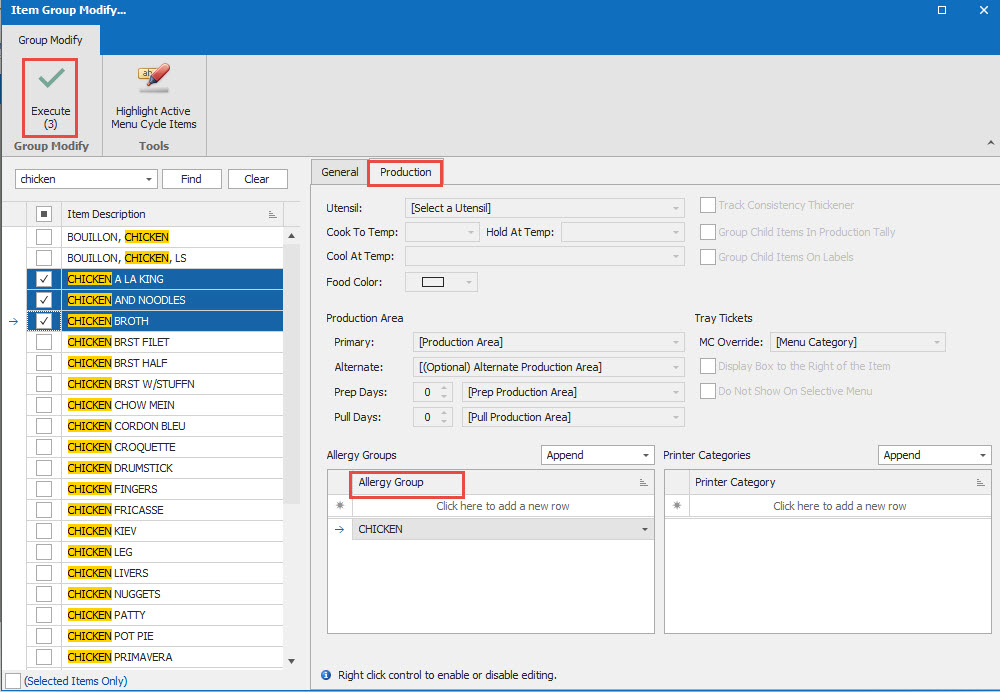
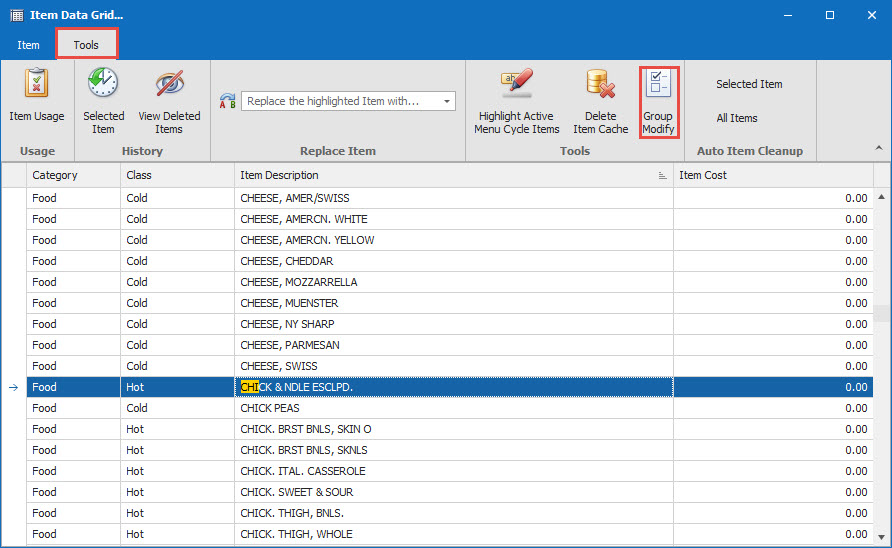
Now go back to the Item Data Grid, Tools. Choose Group Modify, 
6.
Choose Production Tab, Allergy Group and add in the specific Allergy Group you need (see in next image), Then on the left side search for the items and check them off to link to the Allergy Group
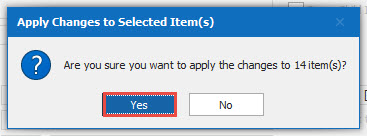
Click on Execute. You will be asked if you want to apply the changes. Click Yes
7.
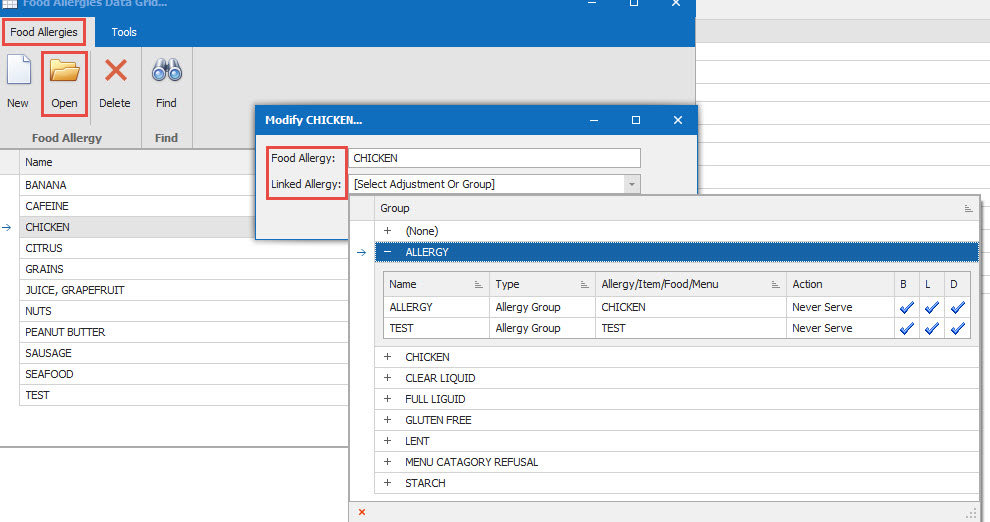
Go to Dietech, Tables, Food Allergies, find Food Allergy. Open to link to the Allergy Group. Double click on the Allergy to generate it into the linked Allergy. 
  • |
  • November 13, 2019

How to Connect for Help

How to Connect for Help


This can be done several ways. You can connect through the Program or by using the Internet
1.
Through the Program
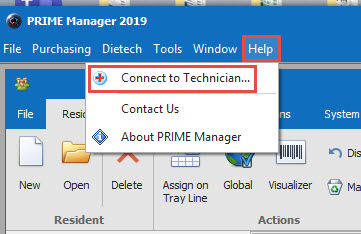
 Go to Help on the task bar at the top. Then choose Connect to Technician
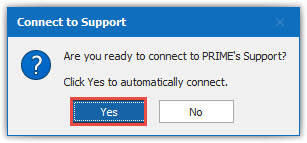
A message box will pop up. Click Yes. This will connect you to the Technical Support Portal and a Technician will take the session and ask how they can help you. 

Or through the Program you can go the the Support Icon on the Resident Data Grid
After you click on the Support Icon a message box will pop up. Click Yes. This will connect you to the Technical Support Portal and a Technician will take the session. 
2.
Using the Internet.  Go to www.psisupport.com.  It will take you to PSI Support - Technical Support Page. Click on the link. 
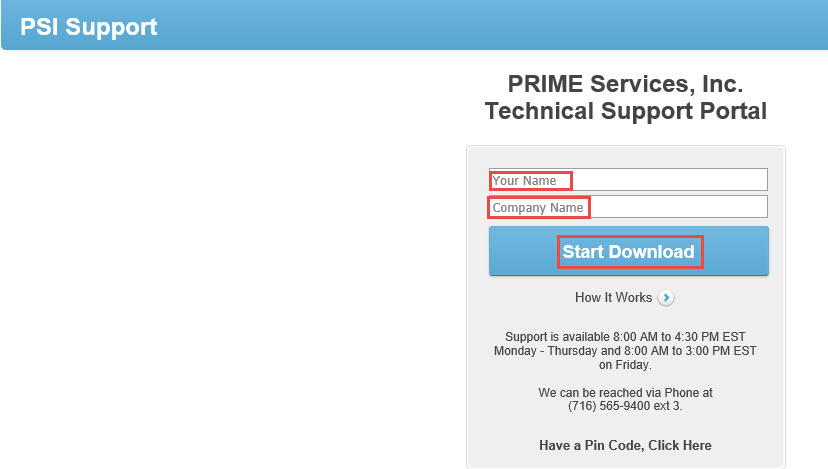
Once you click on the link you will get a box asking Your Name and Company Name. Once you enter in this information click on the Start Download Button
After you click on the Start Download Button a message will pop up at the bottom of you screen, click on Run
After you click on the Run. A message will pop up on your screen saying a technician will be with you. A technician will take your session and ask how they can help you. 
  • |
  • November 13, 2019

Security Roles

Security Roles (Adding/Modifying)

1.
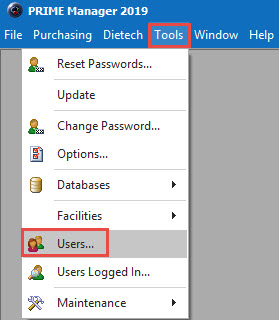
Go to Tools in the top tool bar. 
2a.
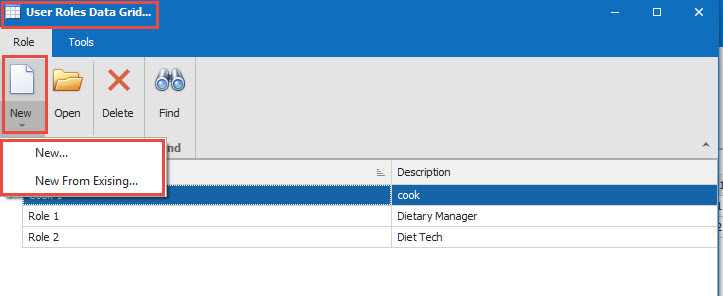
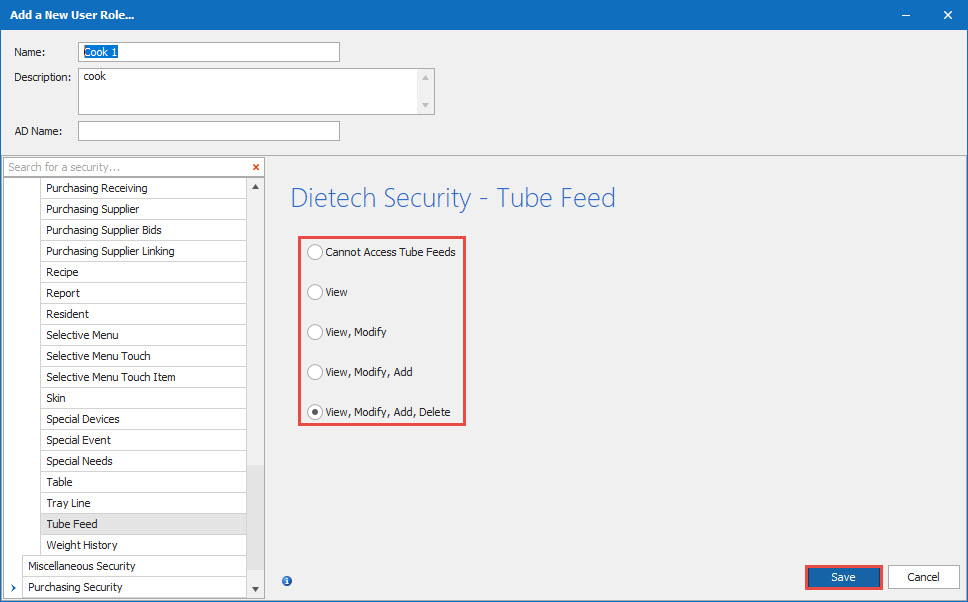
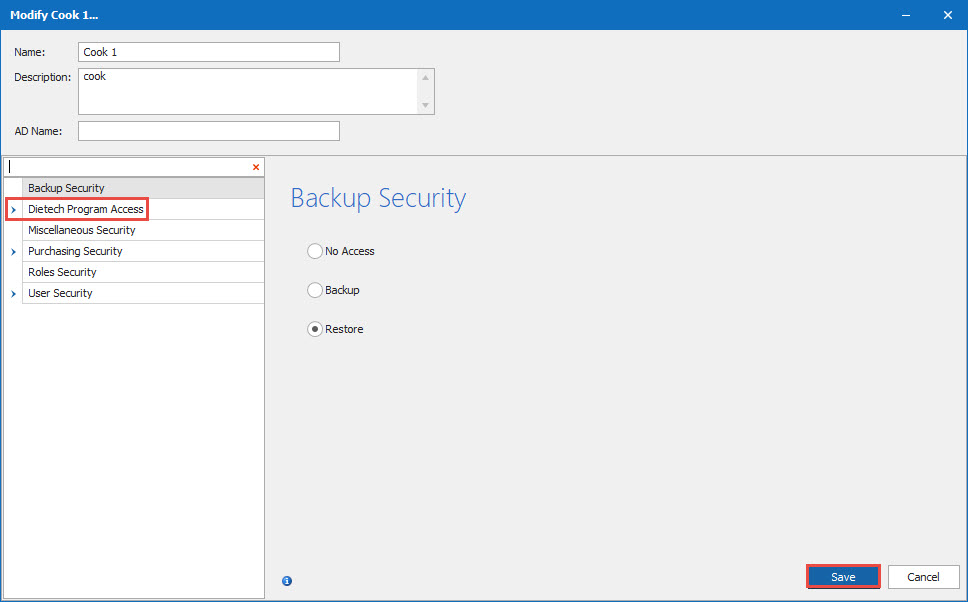
If  Adding a New Role either use the New or New from Existing. Name the new Role and edit the necessary settings, using the choices on the right. It would be best to go line by line to choose the appropriate access for each section of Dietech.  Click Save. 
2b.
If Modifying an Existing Role, select the role and open. Edit the necessary settings, using the choices on the right. It would be best to go line by line to choose the appropriate access for each section of Dietech. Click Save
3.
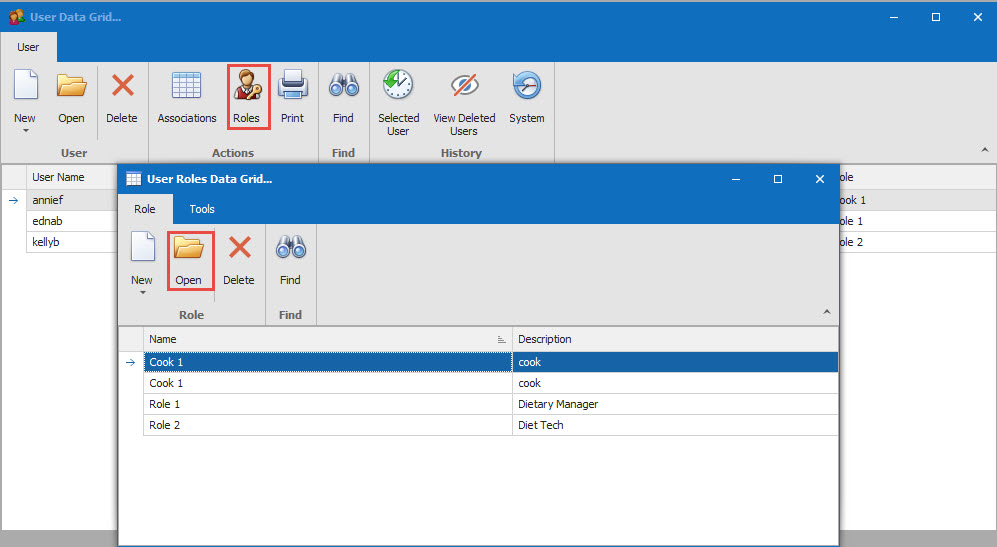
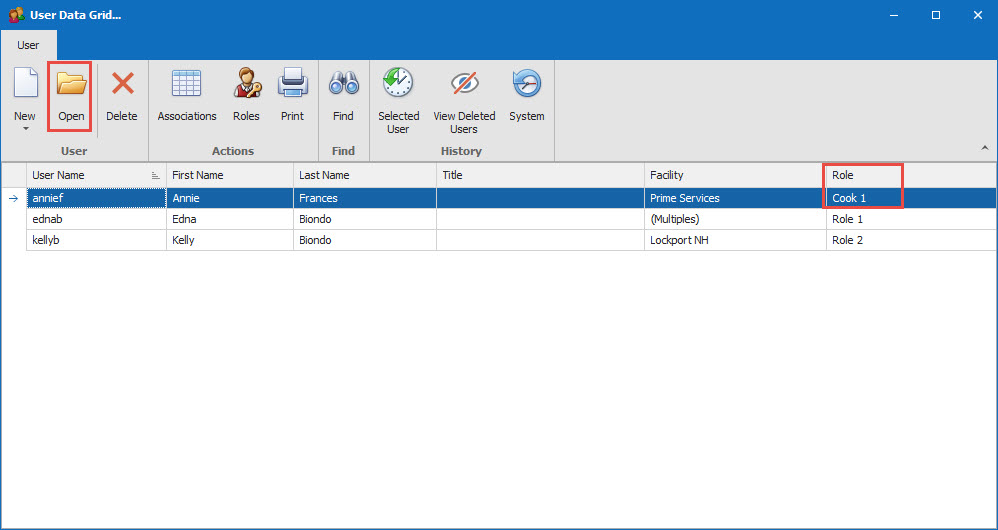
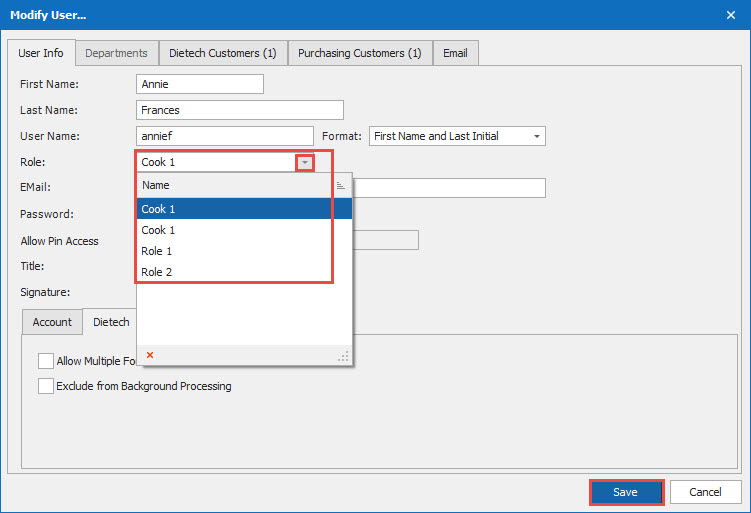
Assign the new role to the appropriate user. Select the User and Open. Add the new Role in for the user. You can also see the user's assigned role in the User Data Grid
  • |
  • November 8, 2019

Dietech Data Update

How To Update Dietech Data (Medication Side Effects, Recipes, Tube Feeding Products)

1.
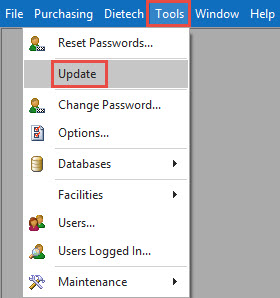
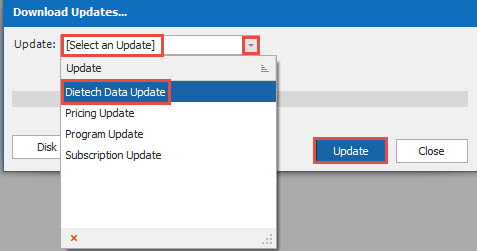
Go to Tools. Choose Update from the drop down box. 
2.
Click on the drop down arrow next to Select an Update. Choose Dietech Data Update
3.
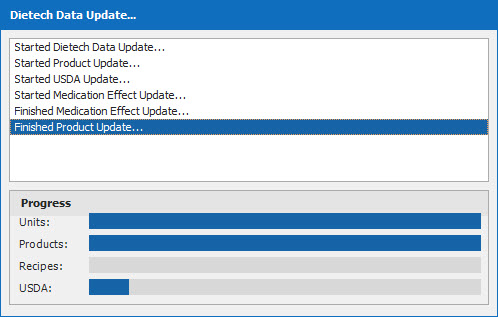
The image below shows the process. 
4.
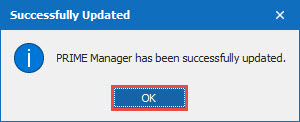
Click on the OK. This indicates the update was successful.
  • |
  • November 7, 2019

How to Temporally Activate a Menu

How to Temporally Activate a Menu

1.
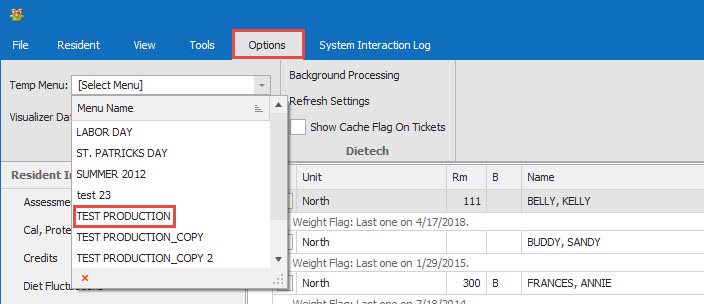
From the Resident Data Grid click on Options. Using the drop down arrow sign choose the menu you would like to make temporally active. It will remain active for only your session. All of the other users will continue with the active menu cycle. 
2.
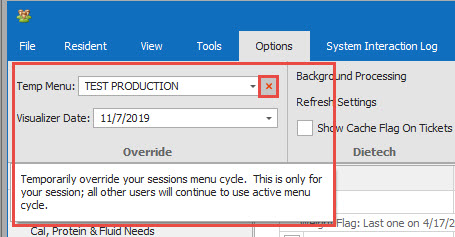
To revert back to the standard active menu either click on the delete button (red X) in the Temp Menu or restart your program. 
  • |
  • November 7, 2019

Report Dashboard

Report Dashboard

1.
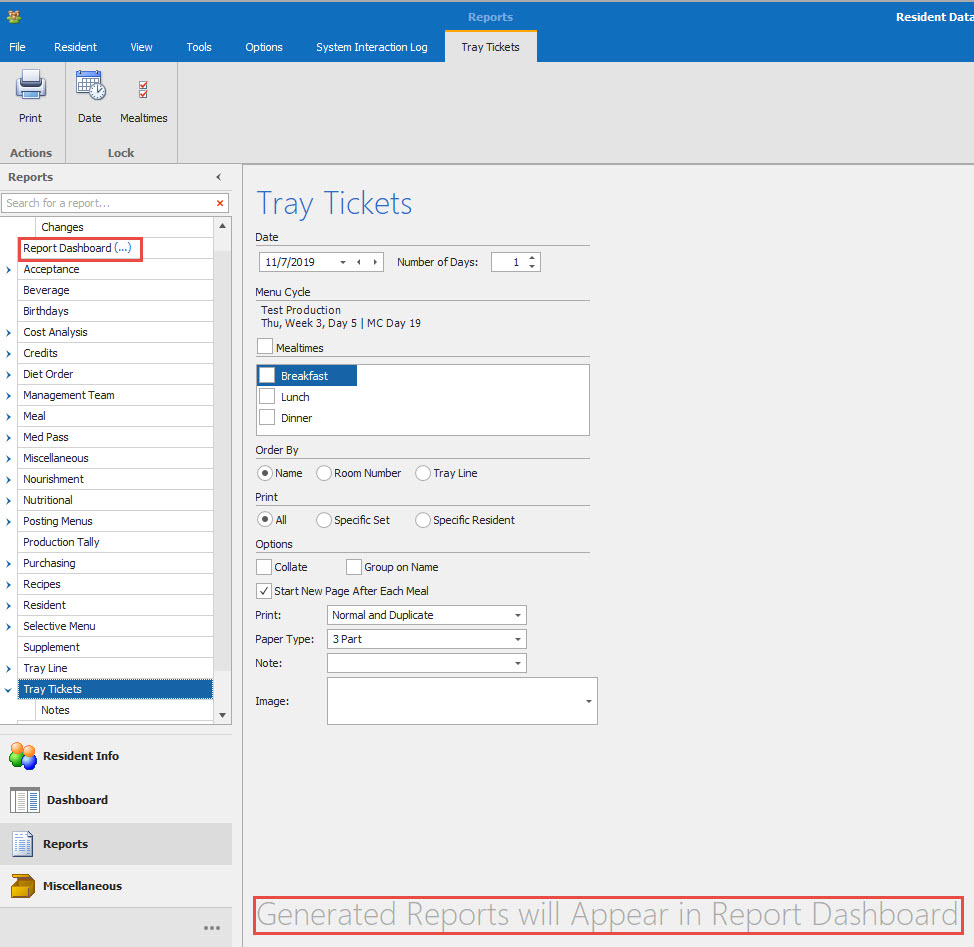
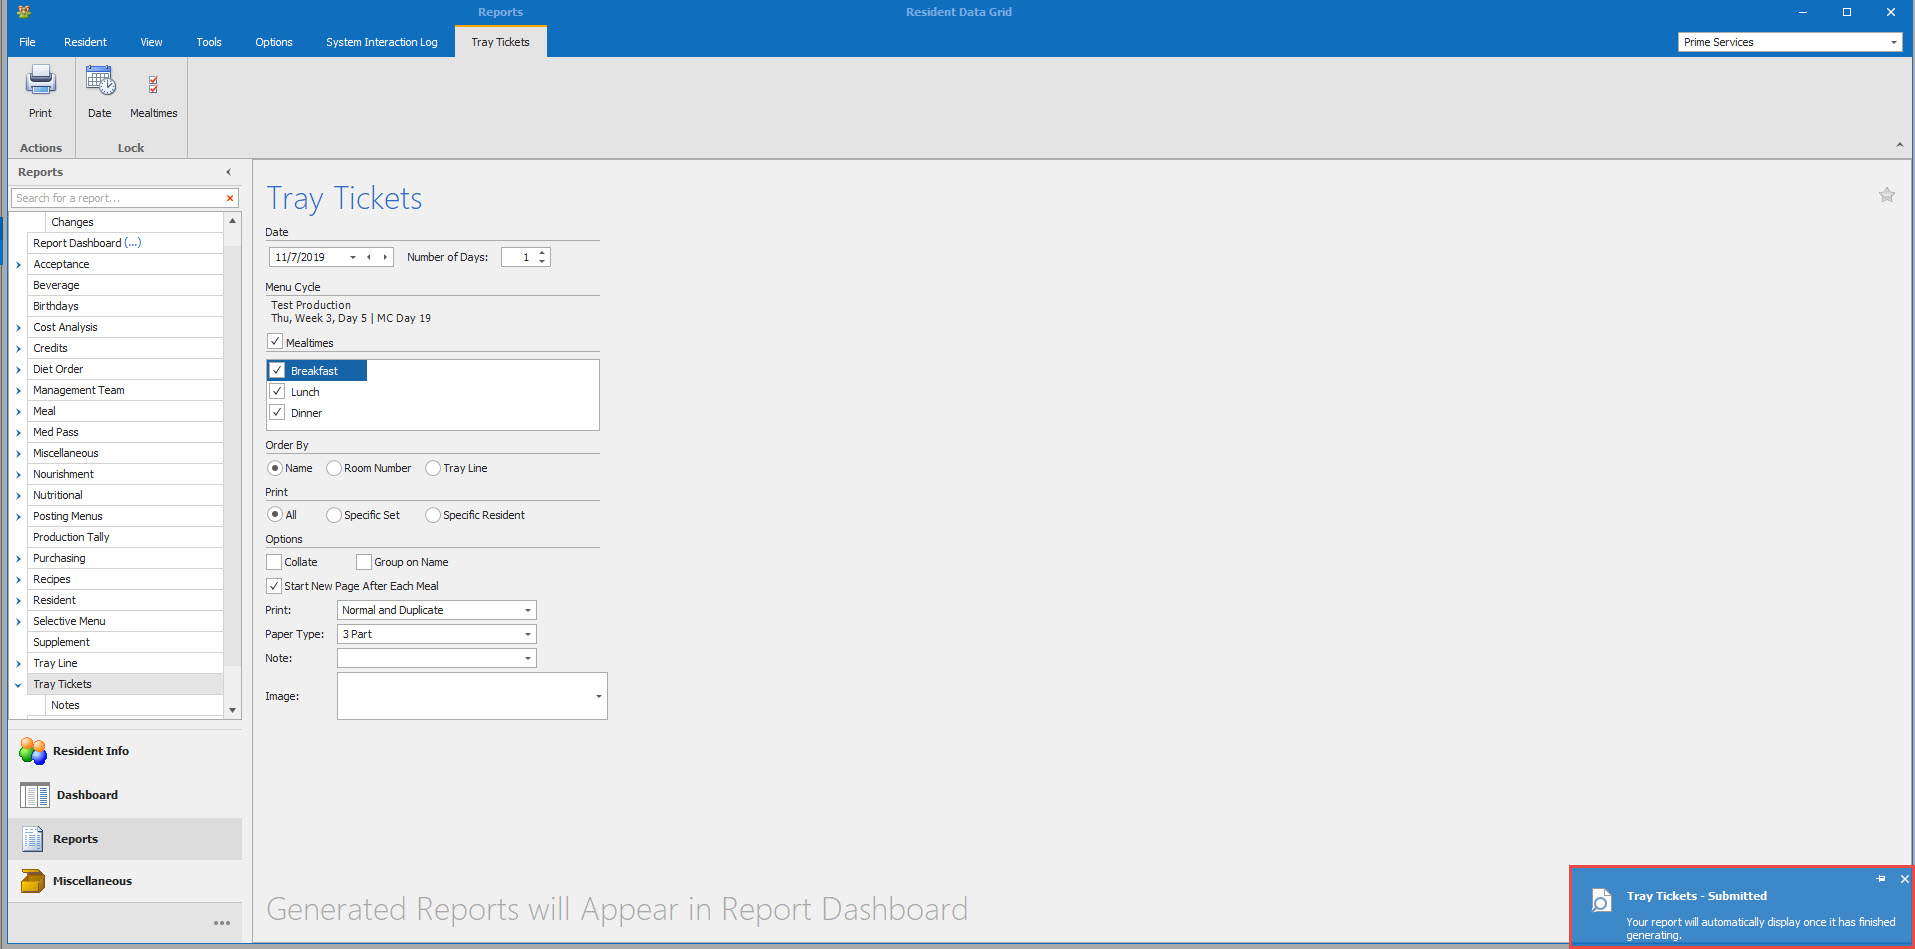
Reports go to the Report Dashboard. This feature will allow you to work in the program while your reports are generating. Once a report has been generated you will be notified. You can go to the Report Dashboard and choose the reports that you want to print. 
2.
If you click on the Print Icon the report will come up on your screen to preview. If you click on the arrow sign below the printer icon the report will go directly to your printer and no preview will show. The report dashboard also show when the report was printed last and the status of the report.
  • |
  • November 7, 2019

Printing Tray Tickets

Printing Tray Tickets 

Printing Tray Tickets All, Specific Set/Cart or Specific Resident.
1.
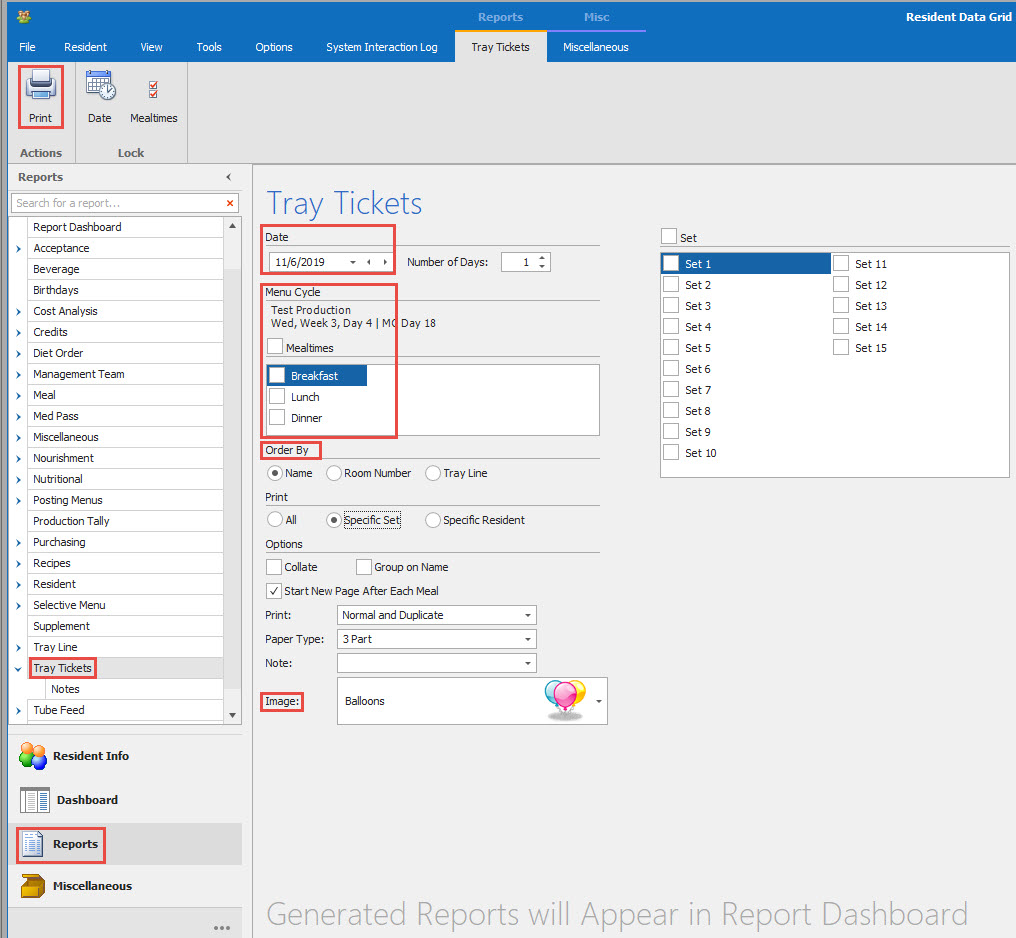
From Resident Data Grid go to Reports.
2.
Click on the Arrow Sign next to Tray Tickets
a. To Print your tray tickets select the date, verify the menu cycle name, week and day.
b. Select the Meal(s).
c. Select the Order By: Name (will print in alphabetical order), Room Order (will print in room order) or Tray Line (prints in the order you have set up in your Tray Line Setup. 
d. Select how you want to Print: All (will print everyone you have assigned to Tray Line, Specific Set/Cart(will allow you to print a specific set(s)/cart(s)and Specific Resident (will allow you to print a specific resident or residents). The Specific Set/Cart and Specific Resident  when chosen will show the options on the right side of your screen for you to choose from.
e. You can select an image to appear at the bottom right side of the tray ticket.
f. And now click on Print Icon in the upper left hand corner. You will have a print preview first, then select Print or Quick Print. Report will appear in your Report Dashboard. 
  • |
  • November 6, 2019

Printing Resident Lists

Printing Residents Lists (Grid and Extended)

1.
GRID - Includes resident name, floor or unit, room number, bed assignment, diet order birthday, age, height and weight.
2.
Extended - Includes resident name, floor or unit, room number, bed assignment, diet order, allergies, adaptive equipment and feeding status.

Both lists can be sorted in room or alphabetical order, by clicking on the column of either name or diet order to sort. And printed by Floor/Unit. 
  • |
  • November 6, 2019

Printing Posting Menus

Printing Posting Menus

1.
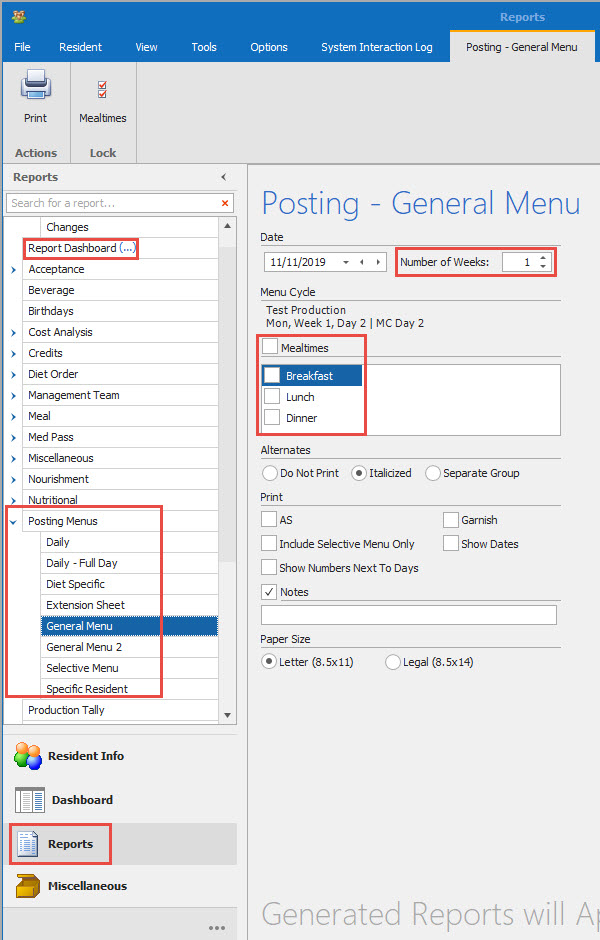
From the Resident Data Grid go to Reports. Go to Posting Menus. Chick on the arrow sign. Choose General Menu. Choose the Date, the number of Weeks and Meals. Click on the Print Icon. The report will let you know when it has generated. If you miss that notification the report will be listed in your Report Dashboard
  • |
  • November 6, 2019

Printing Multiple Meal Patterns

Printing Multiple Meal Patterns

1.
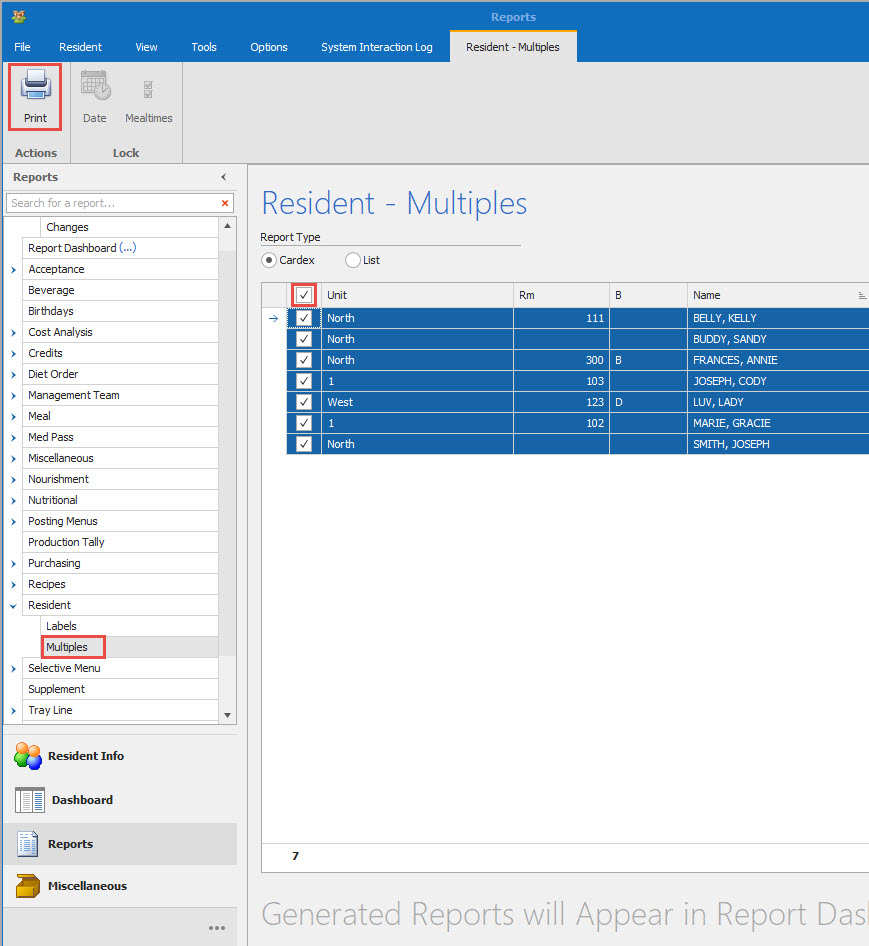
From the Resident Data Grid go to Reports. Click on the arrow sign next to Residents ans choose Multiples. If you are printing All of the residents click on the small box in the upper left corner of the the Resident Multiples Grid to the left of unit. Or you can select any resident  or resident's boxes to print a selected amount of residents. In the upper Left corner click Print
2.
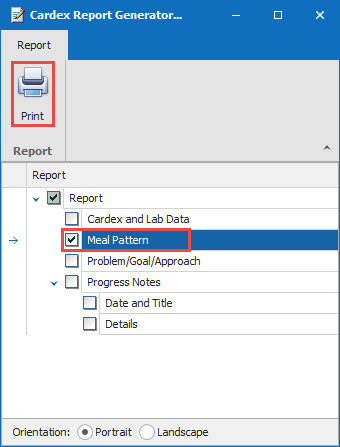
Choose the Meal Pattern (by clicking in the box to the left) and Click the Print Icon
  • |
  • November 6, 2019